You will have to forgive me for straying off-topic. Most (if not all) inquiries are about our lives here in the Japanese countryside. However, I love getting a bit nerdy and talking about this kind of stuff — YouTube equipment — and lately, I’ve been mulling over this on my morning walks with Pancake.
When I started my YouTube channel, I didn’t worry too much about my equipment, using my old FujiFilm T-X20 camera and my trusty iPhone 10 to make my first video in April 2023. With those two items and a very rough understanding of my computer’s editing software, I put together my very first video about akiya living in the Japanese countryside.
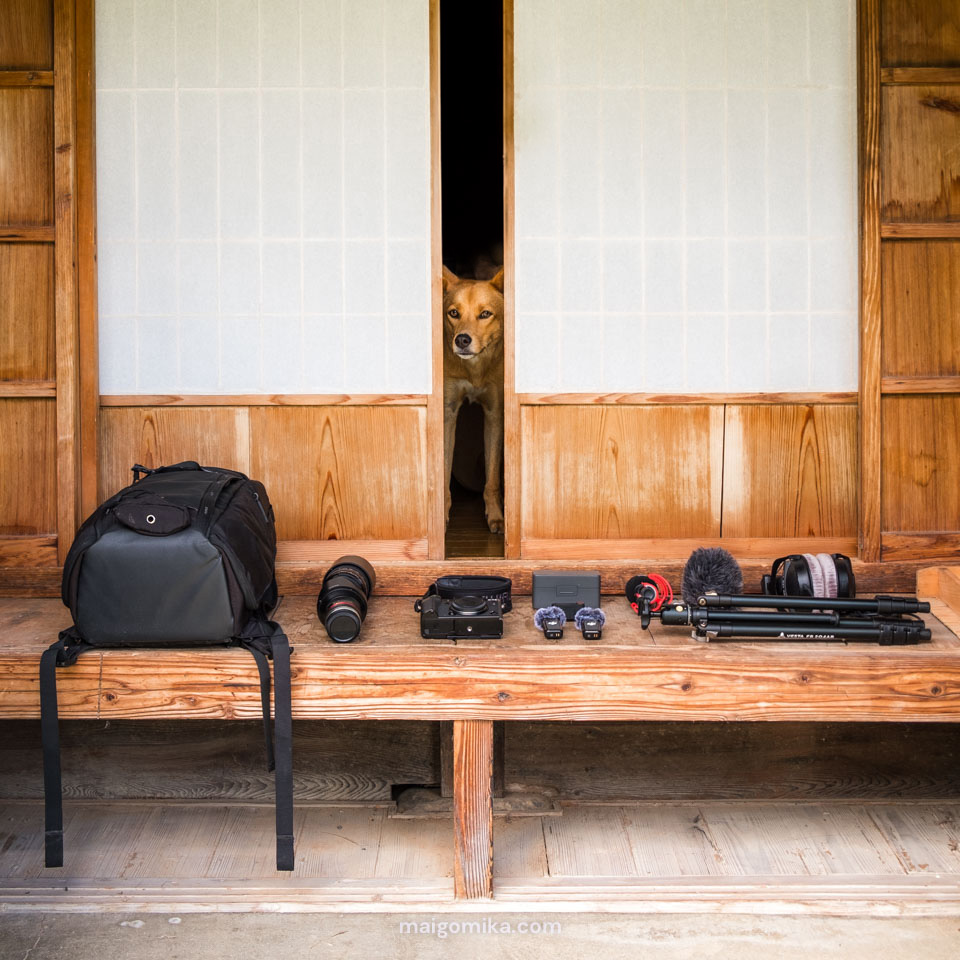
Since then, I have invested in extra YouTube equipment to improve the video quality, adding depth (and even more fun) to my videography and editing process. In this post, I’ll give you a rundown of the equipment I use and talk about some of the pros and cons, while our beloved dog, Pancake, models some of my equipment.

My Cameras: FujiFilm XT5 and iPhone 12
I make my YouTube videos using a FujiFilm X-T5 with my FUJINON XF18-55mmF2.8-4 R lens and iPhone 12. I started with my very first camera, the FujiFilm T-X20, which is also a versatile camera suitable for both photography and videography. Yet, I did notice a huge improvement in video and colour quality with my upgrade to the X-T5.


The FujiFilm XT5 also has in-body image stabilization (IBIS) to reduce shaking when filming (though it’s not ideal for walking or panning shots unless you use a gimbal.)
For these types of shots where I may be moving around a lot, I prefer using my iPhone 12 for its built-in stabilization. While it doesn’t offer the same quality as my FujiFilm, it’s perfect for those shots where I need to be more hands-free and don’t want to be left with horribly shaky footage.

Should I get the same camera?
When choosing a camera, I would suggest considering the type of videos you want to create. If having a fully articulated screen and good autofocus is a priority, I suggest looking into a different camera. While I love my FujiFilm TX5, it lacks a fully articulated screen, which isn’t ideal if you want to see the screen while you are facing the camera. In general, I also find that the FujiFilm X series struggles with its autofocus, tending to wobble between different subjects.
Paolo from Tokyo uses the Canon EOS R, while other YouTubers such as Currently Hannah and Chris Abroad both use the Sony A7SIII for their videos.
I also want to emphasize that, creating a YouTube video really only takes your smartphone. If you focus on straightforward storytelling and clear-cut editing, your audience won’t even notice your smartphone-quality footage. Trust me!
My Microphones: Rode VideoMic GO II & DJI Mics
While I don’t believe an investment in an expensive video camera is necessary when you are starting on YouTube, my tune changes when it comes to audio. When you start adding voice-overs or dealing with noisy background sounds, it can distract your audience. Even beautiful videography won’t keep them around for long if the audio sucks!

I use two microphones: the Rode VideoMic GO II and the DJI Mic. The Rode VideoMic GO II goes directly onto my camera, which records audio directly into my footage. Overall, the microphone added such a robust sound, and voiceovers were much easier to clean up in post-production. (Plus, I no longer have to hold my breath while filming, so the camera’s built-in mic didn’t pick up my breathing.)


I also got the Rode microphones deluxe windshield to minimize wind interference in my audio, especially on windy days. I find that, while it doesn’t completely eliminate wind noise, it is much easier to remove in post-production if I stick this windshield onto my mic.


One inconvenient aspect of the Rode system is that when you connect it directly to your computer, you are required to use their Rode computer application. If you record multiple sessions and want to download them onto your computer, you’ll find that you can only download one recording at a time.
I eventually invested in a second set of microphones, the DJI Mic, to record more up-close-and-personal shots where either Jesse or I could speak directly into a mic while minimizing surrounding noise interference. I can also record directly into my microphone, plug it into my computer, open the microphone folder, and drag and drop all my recordings.

The DJI Mic includes two wireless lavalier microphones that can be clipped onto you using a clip or strong magnet, as well as a receiver. They all come neatly in a magnetic charging case which securely stores all the loose elements in place with its built-in magnets.
It is not precisely a freestanding microphone for podcasting, but it is a perfect addition to my YouTube equipment when I’m on the move or recording our Q&A sessions on Patreon.
Should I get the same microphones?
While a sound engineer or professional videographer might have more detailed advice on which mic would be best for you, my Rode and DJI systems work wonderfully for my everyday YouTube business, and I have enjoyed using both systems. If, however, you want to record more podcast-style videos, consider something else, such as a freestanding microphone.
My Headphones: Beyerdynamic DT 770 PRO
In line with my thoughts on the importance of audio, I also recommend investing in a good pair of headphones. One of my more recent purchases is the Beyerdynamic DT 770 PRO headphones. Today, I can’t imagine returning to the cheap earbuds I bought from the nearby Lawson convenience store. Thankfully, Pancake put me out of my misery by eating two of my crappy earbuds, prompting me to invest in some proper big-girl headphones.

The Beyerdynamic DT 770 PRO is considered an industry standard, is often recommended by videographers for videographers, and comes in at a comfortable price of around USD 170. Their closed-back design reduces outside noise while ensuring an immersive audio experience and allows me to pick up sounds I can edit out in post-production — sounds I did not hear with my old earbuds.
It is a bit bulky with a long cord and may not be the most suitable for on-the-go, but I use these solely at home, so this doesn’t bother me.
Riverside.fm’s review of headphones for videographers ultimately sold these headphones to me, so I would suggest giving it a read for a more in-depth review of why these headphones are so great.
Should I get the same headphones?
I highly recommend the Beyerdynamic DT 770 PRO.
Tripod: Vanguard Vesta FB 235AB
I am currently using the Vanguard Vesta FB 235AB as my tripod. After breaking its predecessor, the Vanguard Espod CX 203AP, a robust but bulky tripod, this newest addition to my YouTube gear has felt like an upgrade, weighing in at about 2.7 pounds and more travel-friendly than the 203AP. It folds down to 14.8 inches and has a ball head mount, making it pretty easy to level my shots.

It also has a reversible central column, so you can flip your camera upside down to get through ultra-low shots to the ground you just can’t get when standing your camera on the top of the tripod.
Should I get the same tripod?
Frankly, if you prioritize durability and strength, I think any decent tripod build will serve you well. However, I have enjoyed my Vanguard Vesta FB 235AB and appreciate its relatively low price point of 16,500 yen (*approximately 115.00 USD). (The US Vanguard store doesn’t have the same tripod on its online shop, but they have similar tripods.) It is portable enough to be a solid choice for any YouTuber.
*Based on Sept. 2024 exchange rates.
My Camera Bags: VEO Adaptor S46 Black Camera Backpack
My VEO Adaptor S46 Black Camera Backpack is compact and light, keeping my camera gear organized and secure. The inner adjustable pockets provide a high level of security, ensuring that my two cameras with three lenses (including a long telescope lens) don’t shift around. I also like the top pouch, which I use to store my microphones and wallet, and the smaller top zipper, which is the perfect business card pocket for those impromptu Japanese business exchanges.

I do find its tripod holder, composed of a small pocket with a strap, a bit flimsy and awkwardly placed on the back of the bag, so I mainly use my water bottle pocket to carry my tripod.
While I have become accustomed to the side pockets on both sides of the bag, there was a point when I would frequently forget which side contained which camera. My first camera bag was a Tenba Solstice 7L sling bag, which I LOVED — it was ideal for carrying one camera and two lenses in a slingback style, allowing me quick access to my camera, zip it up, and flip it onto my back with ease.


When I needed a larger camera bag to accommodate my growing YouTube gear, I wanted it to have the same convenient side pocket access. However, I would often forget which side I packed the lens on, prompting me to take my bag off to access my equipment. While I have grown accustomed to this bag, in hindsight, a single back opening might have been a better option.
Should I get the same bag?
I also enjoy using the VEO Adaptor S46 Black Camera Backpack. It’s compact, sleek, urban design, and affordable compared to other camera bags. The VEO Adaptor S46 Black Camera Backpack is one of the more affordable camera bag options at about 159.99 USD. However, the side pockets might take a bit of getting used to.
When choosing a camera bag, consider the weight of your cameras, lenses, and other YouTube equipment. I highly recommend the Tenba Solstice 7L sling bag if you have one camera and an extra lens. While Tenba has a larger 10L version, I tend to err on the side of caution when carrying heavy packs on one shoulder.
My Royalty-Free Music Platform: Uppbeat & Artlist
Music. MUSIC. MU👏U👏U👏U👏U👏U👏U👏U👏U👏SIC. Watching my videos might give you a sense of how important music is to me. I can spend hours listening to lists of songs to find the right one for the right moment.
There are a handful of royalty-free music providers, but the big three you may have heard of are Uppbeat, Artlist, and Epidemic Sound — the first two which I will cover below.

Since my YouTube journey began, I have mainly used Uppbeat as my prime royalty-free music provider. Out of the three, I prefer Uppbeats’ interface the most and find it the easiest to navigate its music library.
For example, Uppbeat’s interface allows you to sample each song with its player at the bottom of the page, which is never interrupted, even when I open new tabs or click on new genres.
Uppbeat’s “more like this” feature also shows a long list of similar-sounding music, so whenever I find a “close but not quite right” song, I have a complete list of similar-sounding options to browse through. I also like the ease with which I can use the Uppbeat tags, which assign each song a list of music genres, which I can then click to open a page with a list of songs associated with that tag.
However, Uppbeat has the smallest library compared to Artlist and Epidemic Sound. More recently, I subscribed to Artlist to expand my music options, and I have really enjoyed this new selection the Artlist library has brought me. Artlist also has a more robust collection of classical music ( Beethoven, Bach, symphonies, etc.), something I felt was missing on Uppbeat.

Artlist, much like Uppbeat, includes a genre tab for each song, which provides a way to categorize music based on its style. However, a notable difference is that Artlist only reveals a limited selection of associated genres unless you click on the specific song to access a detailed page. This means that to fully understand the range of genres linked to a particular track, you must take the extra step of navigating to its individual page.
On the other hand, Uppbeat offers a more user-friendly experience by displaying the associated genres directly on the search results page. This feature allows users to easily glance at the various genre tags without needing to click through to each song.
You might wonder why this is significant. For me, having immediate access to genre tags is incredibly helpful for inspiration. It enables me to explore different musical styles more efficiently, helping me discover new songs and artists that align with my interests. This capability to quickly navigate through genres ultimately enhances my music search experience.


Artist offers a “suggested song” feature that bears a resemblance to the one found on Uppbeat, yet it operates somewhat differently. Artlist only presents a selection of five suggested songs, which may feel limited to me, since I like looking through for a broader range of options.
In contrast, Uppbeat enhances the user experience by launching a new page filled with a plethora of music recommendations, allowing for a more extensive exploration of tracks that might pique one’s interest.


While I appreciate the vast collection of high-quality music available on Artlist, I must admit that I find its interface to be slightly less intuitive and user-friendly, which can make navigation a bit cumbersome at times. Despite this, I have been thoroughly enjoying diving into their extensive library of high-quality, professional compositions.
On the other hand, Uppbeat, although it currently has the smallest collection among the platforms I’ve explored, is making great strides in expanding its offerings. I’m genuinely excited to see how their catalogue develops in the future!
Should you get the same music subscription?
Uppbeat offers a monthly subscription at an appealing price of $6.99, making it an excellent option among various music providers. Additionally, it provides a starter account with three complimentary monthly downloads from its non-premium library, allowing you to sample the platform and the tracks in your videos before committing a year.
However, it’s worth noting that royalty-free music platforms like Artlist and Epidemic Sound feature significantly larger libraries. Both of these options start at $9.99 per month. If you’re looking to incorporate a wide range of sound effects in your videos, you might find the libraries of Artlist (or Epidemic Sound) more suitable, as I don’t find Uppbeat’s sound effect offerings to be as extensive as those of its competitors.
If you choose a full-year subscription to Artlist, consider using my referral link. We will both get two extra free months, but no pressure!
I would certainly recommend Uppbeat or Artlist, but ultimately, the best choice for your music subscription will hinge on your personal musical preferences. I encourage you to explore the available tracks from each provider to discover which resonates most with you.
My Video Editing Software: Adobe Premiere Pro
I have been a long-time Adobe Creative Cloud user, utilizing Photoshop, InDesign, and Lightroom for all my design/work needs, which naturally set me on the path to Adobe Premiere Pro.

One of the features I love about Premiere Pro is the new remix tool. With this feature, I can drag the length of a music track, and it will seamlessly shuffle elements of the song to fit my desired length.

Should I get the same editing software?
Adobe Premiere Pro is one of the industry standards for video editing software, with an endless list of editing tools and features. To be quite frank, I have barely scratched the surface of most of these features, leaving me wondering if recommending Premiere Pro is wise, especially for someone just wanting to dip their toes into video editing.
Adobe Premiere Pro is also one of the most expensive video editing software, requiring a monthly subscription of USD 22.99. Final Cut Pro, another industry standard, has its own steep learning curves, but it only comes at a one-time USD 299.00 fee and doesn’t require a subscription. It also has a free 90-day trial.
I have also heard great things about Davinci Resolve’s simplicity. I have not used it before, but they have a free version you can test.
At the end of the day, as an Adobe Creative Cloud user, it made sense for me to turn to Adobe Premiere Pro for my video editing needs, and I have gotten pretty familiar with it. However, if you don’t use other Adobe software, I suggest looking at alternatives to use something more affordable or beginner-friendly.
In Conclusion…
It can get busy regarding YouTube gear; you read that you must get the right camera or microphone, and don’t forget the gimbal, tripods, lighting, and other endless equipment list! At the end of the day, though, I started my YouTube journey with my trusty old FujiFilm and iPhone to tell a straightforward, well-outlined story. If you want to dip your toes into that big ol’ YouTube pool, just start with what you have. Let your content, unique perspective, and good old clear and concise storytelling speak for themselves.
Are you an established YouTuber or just beginning your creative journey on YouTube? I would love to hear about what tools and equipment you use for your videos in the comments below!👇


